
Geomembrane Installation Guide: From Site Preparation to Seam Testing
Geomembrane installation is not just unrolling a liner and welding the overlaps. The long-term performance of a geomembrane containment system depends on how the material is specified, produced, transported, laid, seamed, tested and protected on site.
For engineers, designers and installation contractors, the critical question is not only what geomembrane to buy, but how to finish the complete liner system without creating wrinkles, punctures, weak seams, excessive stress or difficult-to-repair areas. A properly planned installation typically involves:
Site preparation → Subgrade inspection → Liner layout → Geomembrane deployment → Seam testing → Seaming and welding→ Repairs → Anchoring and detailing → Protection → Final inspection
This guide explains the major stages of geomembrane installation and the practical issues that should be considered before and during construction.

What Is Geomembrane Installation?
Geomembrane installation is the project site process of placing impermeable synthetic membrane liner over a prepared surface and joining them to create a continuous barrier against liquid or gas migration.
Geomembranes are widely used in:
- Landfill liners and caps
- Mining containment systems
- Water reservoirs
- Irrigation ponds
- Aquaculture ponds
- Wastewater treatment facilities
- Biogas and anaerobic digestion systems
- Industrial containment
- Secondary containment
- Canals and water infrastructure
HDPE geomembrane is commonly selected for applications requiring high chemical resistance, dimensional stability and long-term durability. LLDPE geomembrane is popular for applications that require flexibility and elongation.However, material selection and installation cannot be separated.A high-quality geomembrane can still fail to perform as intended if the subgrade is unsuitable, construction layout is disordered, seams are improperly welded or completed seams are not fully tested.
1. Start With the Liner System, Not the Membrane Roll
Depending on the application, a typical system may include:
- Prepared subgrade
- Geotextile protection or cushioning layer
- Geomembrane
- Geosynthetic clay liner
- Drainage geocomposite
- Protective soil layer
- Concrete or other protective cover
The exact configuration depends on the project design.
For detailed material selection, the Planetliner Geomembrane and HDPE Geomembrane pages can be used as the product-level references.
2. Subgrade Preparation Is the First Critical Installation Step
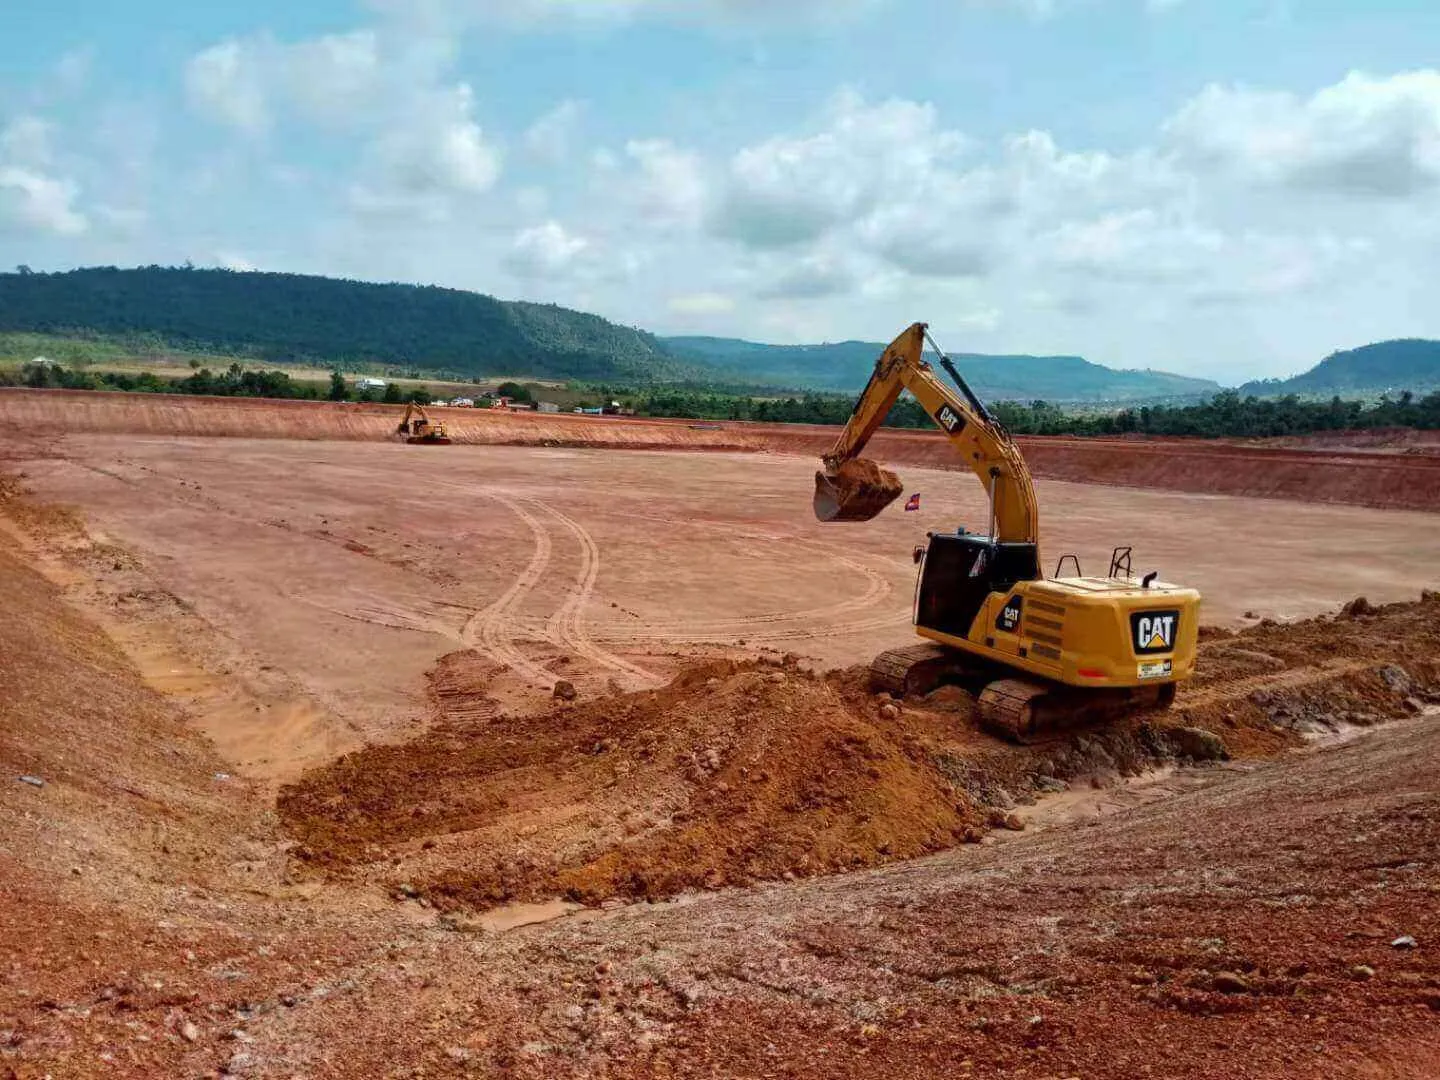
One of the most common mistakes in geomembrane installation is assuming that a geomembrane can compensate for a poor foundation. It cannot.
The subgrade should be prepared according to the project design and installation specifications before geomembrane deployment.
The surface should generally be:
- Stable
- Properly graded
- Smooth
- Free from sharp stones
- Free from protruding roots
- Free from construction debris
- Free from standing water where inappropriate
- Capable of supporting installation equipment without damaging the liner system
Sharp objects are particularly dangerous because they may damage the geomembrane liner during installation or later. For this reason, additional protection may be required in certain subgrade conditions.
Should geotextile be installed under geomembrane? Sometimes, yes.
A geotextile layer can be used under the geomembrane where the subgrade contains angular particles or where additional puncture protection is required.
The appropriate geotextile type and weight depend on:
- Subgrade conditions
- Aggregate characteristics
- Expected loads
- Construction traffic
- Project design
- Required protection level
This is one area where geomembrane and geotextile should be considered together rather than as completely separate products.

3. Plan the Liner Layout Before Unrolling the Geomembrane
A good layout can reduce:
- Field seam length
- Material waste
- Difficult corner details
- T-seams
- Excessive wrinkles
- Installation time
- Potential seam defects
The liner layout should consider:
- Site dimensions
- Slopes
- Corners
- Anchor trenches
- Penetrations
- Drainage structures
- Pipes
- Access points
- Expected thermal movement
- Welding direction
On slopes, liner orientation should be determined by the engineering design and site geometry. Industry practitioners specifically discuss aligning liners with the slope direction to manage stress and reduce problematic field seams.

4. Geomembrane Deployment
Once the subgrade and liner layout have been approved, geomembrane rolls can be laid.
The basic principle is simple: Move the membrane into position without damaging it.
But large geomembrane rolls can be heavy and difficult to control, particularly on slopes or in windy conditions.
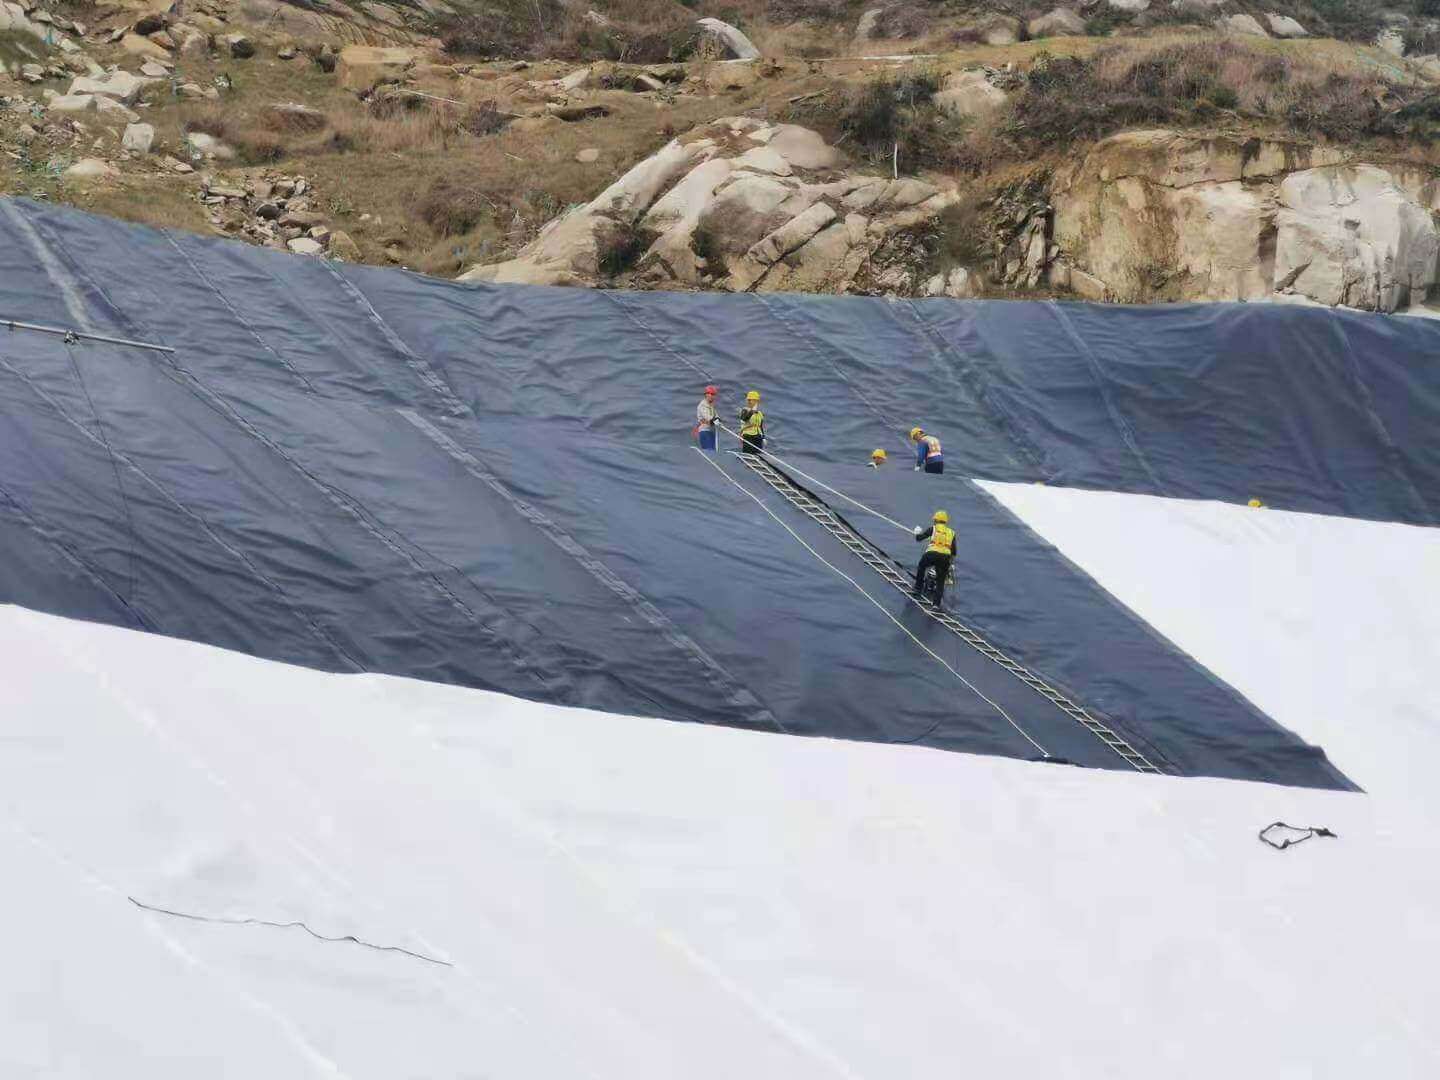
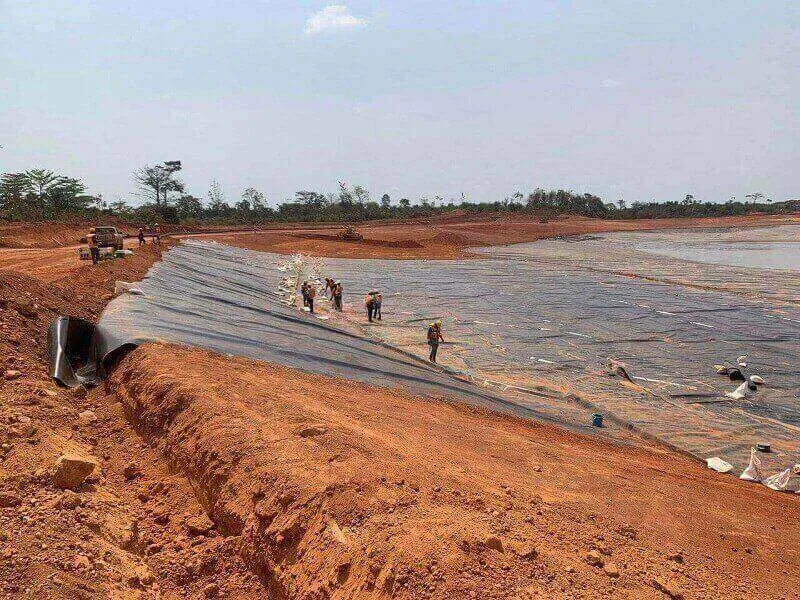
Membrane material laying should follow the principles of “slope first, then site bottom; farthest first, then nearest; top to bottom.” Large-area projects can be divided into sections for construction to reduce the number of joints. During laying, manual labor and machinery should be used to slowly spread the membrane. Dragging or twisting the membrane is strictly prohibited. The membrane should be kept naturally loose, smooth, and tightly adhered to the substrate, with a allowance of approximately 1.5% for deformation to prevent cracking due to temperature changes or soil settlement.
5. How Much Overlap Is Needed for Geomembrane Welding?
There is no single universal overlap dimension that should be applied to every project.
The required overlap depends on:
- Geomembrane thickness
- Material type
- Welding equipment
- Manufacturer recommendations
- Project specifications
- Seam configuration
In many HDPE geomembrane installations, field seams are prepared with an overlap sufficient for the welding equipment and subsequent seam testing. Typical industry guidance often falls around the 75–150 mm range, but the project specification and welding equipment should take precedence.
The important principle is:Do not choose overlap number appears on an internet installation guide.
The overlap needs to work with the actual welding machine and the required quality-control procedure.


6. Geomembrane Welding: The Most Important Installation Operation
For many geomembrane projects, seaming is one of the most technically sensitive parts of installation.The two major field welding methods are:
1).Hot Wedge / Fusion Welding
Commonly used for long, relatively straight seams.
The machine heats the overlapping geomembrane surfaces and applies pressure as it travels along the seam.
A double-track fusion welder can create an air channel between the two tracks, allowing subsequent pressure testing.
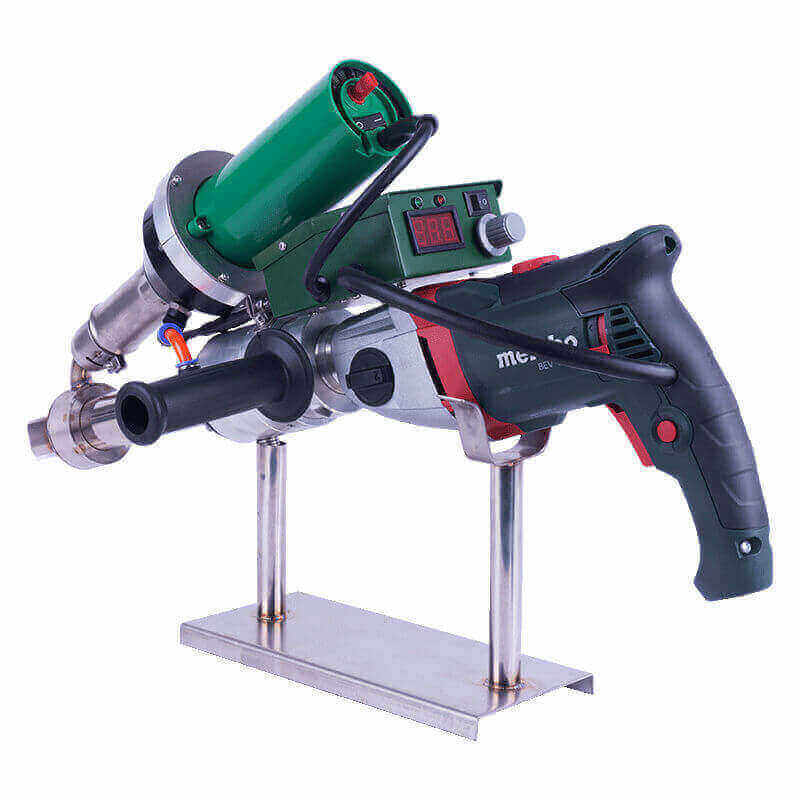
2).Extrusion Welding
Typically used for:
- Repairs
- Corners
- T-joints
- Pipe penetrations
- Irregular details
- Locations where automatic wedge welding cannot be used
The operator uses an extrusion welder to apply molten polymer to the prepared seam area.The two methods are complementary rather than competitors.

7. Why Trial Welding Matters
One of the most important practical lessons in geomembrane installation is this: yesterday’s welding settings may not work today.
Welding conditions can change because of:
- Ambient temperature
- Membrane temperature
- Wind
- Moisture
- Membrane thickness
- Material formulation
- Welding machine condition
- Machine speed
- Operator technique
Therefore, trial welds should be done according to the project quality plan and applicable specifications before production welding.
The purpose is to establish appropriate welding parameters and verify that the equipment and material combination can produce acceptable seams.
Industry installation guidance also emphasizes trial welds before production welding, rather than relying on a fixed temperature or speed copied from another project.
8. Why Geomembrane Welding Temperature Cannot Be a Single Number
This is a common Google question: What temperature should HDPE geomembrane be welded at?
The wrong answer is simply 400°C or 450°C.
There is no universal welding temperature that works for every machine, thickness, material and environmental condition.
Welding quality is determined by the interaction between: Temperature + Speed + Pressure + Material + Surface Condition
For example, increasing temperature while maintaining the same welding speed changes the amount of heat transferred to the membrane.
Likewise, increasing welding speed without increasing temperature can reduce heat input.
Therefore, welding parameters should be confirmed by trial seams and adjusted according to the actual equipment, membrane and site conditions.
This approach is more reliable than copying a fixed number from an online article.
9. What Causes Geomembrane Welds to Fail?
Common causes include:
1) Contaminated seam surfaces:Dust, mud, moisture or other contaminants can interfere with fusion.
2) Incorrect welding parameters:Too little heat or excessive travel speed can contribute to inadequate fusion. Excessive heat can also damage the membrane.
3) Poor machine alignment:A welding machine that moves inconsistently can produce irregular seams.
4) Wrinkles in the welding area:The welding path needs to be controlled carefully. Significant wrinkles can interfere with consistent contact and machine movement.
5) Poor T-joint detailing:T-seams are particularly important because several layers and directions intersect. Recent professional discussions specifically highlight T-seams as technically challenging areas requiring careful welding order, detailing and testing.
6) Inadequate testing:A seam that looks good is not necessarily a seam that has passed quality control. That distinction is critical.
10. Geomembrane Seam Testing
A professional installation should include appropriate seam inspection and testing according to the project specifications.Two broad categories are commonly used.
10.1 Non-Destructive Testing
The entire seam can be examined without cutting out samples.Depending on the seam design, methods may include:
- Air pressure testing
- Vacuum box testing
- Other project-approved leak detection methods
Double-track fusion seams with an air channel are particularly suited to pressure testing.
Extrusion welds and irregular areas are often evaluated using vacuum testing or another suitable method.
10.2. Destructive Seam Testing
Selected seam samples may be removed and tested for mechanical performance according to the project quality plan and applicable standards.
Testing can include:
- Peel testing
- Shear testing
- Other specified mechanical tests
The objective is to verify that the field welding process is producing seams with the required mechanical performance.For large engineering projects, the quality-control documentation should connect test results with:
- Seam identification
- liner number
- Welder/operator
- Date
- Location
- Welding equipment
- Trial weld results
- Repair records
This creates traceability when a problem is discovered later.
11. What About T-Seams and Corners?
Corners, penetrations and T-joints deserve special attention.They are different from long, straight seams because the geometry becomes more complicated.
Typical difficult areas include:
- Three-liners intersections
- Pipe penetrations
- Internal corners
- External corners
- Anchor trench transitions
- Drainage outlets
- Structural connections
These areas may require extrusion welding, patches or specially designed details.Importantly, there is not always one universal construction detail for every T-seam.
Industry discussion shows that patching and extrusion-weld approaches can vary according to project type, material thickness, region and design requirements.
Therefore:Follow the approved project guide rather than improvising a repair method in the field.


12. Geomembrane Anchor Trench Installation
Geomembrane edges often need to be secured to prevent movement.One common solution is an anchor trench.
The geomembrane is extended into the designed trench and secured before the trench is backfilled.
The anchor system needs to account for:
- Site geometry
- Slope
- Membrane movement
- Wind uplift
- Thermal movement
- Backfill material
- Drainage
- Project structural requirements
There is no universal anchor trench size that should be copied between projects.The trench dimensions and details should come from the project design.


13. Installing Geomembrane on Slopes
Slope installation creates additional challenges.
The membrane may experience:
- Sliding forces
- Wrinkling
- Thermal movement
- Wind uplift
- Stress around transitions
- Increased difficulty during welding
Laying orientation and deployment sequence therefore become particularly important.The objective is to avoid unnecessary tensile stress and reduce difficult field seams.Installation crews should also consider how temporary ballast, anchoring and welding equipment will interact with the slope.
On complex slopes, the installation sequence should be determined before deployment rather than improvised after the membrane has already been placed.


14. What Happens in Hot Weather?
This is another question frequently overlooked during geomembrane installation.Black geomembranes can become significantly hotter than air temperatures under direct sunlight.This can lead to:
Thermal expansion
- Wrinkles
- liners movement
- Dimensional changes
- Increased difficulty controlling seams
The installation crew should therefore consider the membrane temperature and site conditions when determining laying and welding procedures.
Do not pull the membrane excessively tight simply even because it looks flat in the morning.The same laying may behave very differently after several hours of direct solar exposure.
15. What Happens in Wind?
Wind is one of the practical problems that can make geomembrane installation surprisingly difficult.A large membrane sheet behaves like a sail.
Temporary ballast such as sandbags may be needed to control movement during laying.
However, ballast placement should not create:
- Point loading
- Membrane damage
- Difficult welding conditions
- Unsafe working conditions
The installation plan should consider local wind conditions before rolls are laid.
In severe weather, delaying deployment may be safer and more economical than trying to control a large exposed membrane sheet.
16. Protecting the Geomembrane After Installation
The installation process is not finished when the final weld is completed.A completed geomembrane can still be damaged by:
- Construction traffic
- Sharp aggregate
- Dropped tools
- Backfilling
- Heavy equipment
- Improperly placed protective layers
Depending on the project design, a protection layer may include:
- Nonwoven geotextile
- Sand
- Soil
- Concrete
- Drainage geocomposite
- Other approved protective materials
Protection requirements should be established before construction begins.

17. Common Geomembrane Installation Mistakes
Here are some of the mistakes that can create expensive problems.
Mistake 1: Installing over an unsuitable subgrade
The liner cannot compensate for sharp stones, unstable soil or poor grading.
Mistake 2: Deploying panels without a layout plan
This can create unnecessary seams and difficult details.
Mistake 3: Welding contaminated surfaces
A dirty seam area can compromise welding quality.
Mistake 4: Using fixed welding parameters
Temperature and speed should be established for the actual conditions.
Mistake 5: Ignoring thermal movement
Geomembrane behaves differently in the morning and under strong afternoon sunlight.
Mistake 6: Treating every seam the same
Straight seams, T-joints, corners and penetrations require different approaches.
Mistake 7: Testing only selected visible defects
Quality control should follow the project’s specified testing program.
Mistake 8: Allowing construction traffic on exposed liner
Mechanical damage can occur before the project is even completed.
Mistake 9: Focusing only on material price
A cheaper liner does not necessarily mean a lower project cost.
Installation labor, welding, testing, material waste and repair work can significantly affect the total installed cost.
18. How to Reduce Geomembrane Installation Cost
The cheapest geomembrane is not necessarily the cheapest containment system. Instead, a better approach is to optimize the total installed cost.
Consider:
1. Roll width:Larger sheet can reduce the number of field seams when site conditions allow.
2. Liner layout: Good layout reduces waste and complicated details.
3. Material thickness:Select thickness based on project requirements rather than simply choosing the thinnest available option.
4. Factory fabrication:For some large or complex projects, prefabricated panels can reduce field welding and installation time.
5. Welding efficiency:Consistent equipment and trained operators can reduce rework.
6. Quality control:Finding a defective seam while the installation crew is still on site is generally easier than discovering a leak after the system is covered.
19. Should You Install Geomembrane Yourself or Hire a Professional?
For small, relatively simple projects, installation may appear simple.But large containment systems are different.
Professional installation should be considered when the project involves:
- Landfills
- Mining facilities
- Industrial wastewater
- Chemical containment
- Large reservoirs
- Large aquaculture facilities
- Biogas systems
- Steep slopes
- Complex penetrations
- Strict regulatory requirements
A professional installation team should understand:
- Liner layout
- Welding equipment
- Trial seams
- Seam testing
- Repair procedures
- Anchor details
- QA/QC documentation
- Site safety
For major projects, the cost of professional installation is usually easier to justify when compared with the potential cost of repairing a buried or covered liner system.
20. Geomembrane Installation Checklist
Before installation:
- Confirm approved drawings
- Confirm membrane specification
- Inspect delivered rolls
- Verify thickness and material
- Inspect subgrade
- Confirm liner layout
- Check anchor trench
- Confirm weather conditions
- Prepare welding equipment
- Make trial seams
During installation:
- Lay liners carefully
- Control wrinkles
- Maintain appropriate overlap
- Keep seam areas clean and dry
- Record geomembrane identification
- Monitor welding conditions
- Inspect completed seams
- Perform specified non-destructive testing
- Complete repairs immediately
- Maintain installation records
Before covering:
- Complete seam testing
- Complete repairs
- Perform final inspection
- Verify penetrations and terminations
- Confirm documentation
- Inspect the exposed liner for damage
- Install the protection layer according to the project design
A successful geomembrane installation is not determined by the membrane alone.It is the result of a complete process:
Correct material selection + suitable subgrade + efficient liner layout + controlled laying+ qualified welding + systematic seam testing + proper protection
For engineers and designers, the priority is to design an installation system that is practical to construct.
Contractors should focus on workmanship, welding conditions and quality documentation.
Meanwhile, procurement teams need to select a supplier that can provide consistent material specifications, technical documentation and support throughout the project.
And for project owners, the most important question is not simply:How much does the geomembrane cost?
It is: Can the complete liner system be installed, tested and protected in a way that provides reliable long-term containment?
That is the real measure of geomembrane installation quality.
FAQ: Geomembrane Installation
1.How is geomembrane installed?
Geomembrane installation generally involves subgrade preparation, liner layout, membrane laying, overlapping, thermal seaming, seam testing, repairs, anchoring and installation of the required protection layer.
2.Can HDPE geomembrane be installed without welding?
For most large containment systems using HDPE geomembrane, two sheets need to be joined by an appropriate thermal welding process. The exact method depends on the membrane and project design.
3.What is the most common method of welding HDPE geomembrane?
Hot wedge or fusion welding is commonly used for long, straight field seams, while extrusion welding is commonly used for repairs, corners and other difficult areas.
4.How do you test geomembrane seams?
Depending on the seam configuration, testing can include visual inspection, air-pressure testing, vacuum box testing and destructive peel or shear testing according to the project quality plan.
5.Can geomembrane be installed on slopes?
Yes. Geomembranes are widely installed on slopes, but liner orientation, laying sequence, anchoring, thermal movement and seam layout require careful engineering and construction planning.
6.Does geomembrane need geotextile to protect?
Not always. A geotextile protection layer may be required where the subgrade or loading conditions create a puncture risk. The requirement should be determined by the project design.
7.How much does geomembrane installation cost?
Installation cost depends on membrane thickness, project size, site conditions, sheet configuration, welding requirements, labor, testing, protection layers and logistics. Material price alone does not represent the total installed cost.
8.Can geomembrane be installed in hot weather?
Yes, but membrane temperature and thermal movement need to be considered during laying and welding. Installation procedures should follow the project specifications and the membrane manufacturer’s recommendations.